How to Mosaic Tile a Metal Mailbox
Buy a steel mailbox at the big box home improvement or hardware store. The cheap $15 version works just fine. Be sure the metal is strong and doesn’t flex (if you need an XL size mailbox, get one that has ribs to strengthen the frame). I reinforce the door with a metal plate, because otherwise the door is most likely to flex and pop off tiles. I remove the flag (which hides the tile design). The mailbox should be lightly sanded all over (except for the bottom rim and any other part that will be exposed and not tiled).
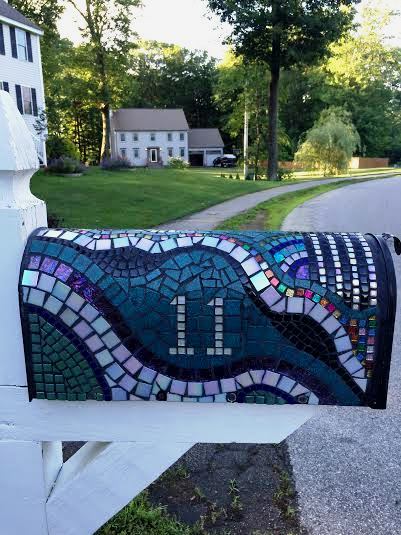
To draw your design on the box, use a silver sharpie pen or one of those red crayon pencils that peel down with a string to expose the tip (I don’t know what those are called, but they sell them in hardware stores for writing on metal). I suspect that if you personalize your mailbox with your address number or name, it is less likely to be stolen.
The best adhesive is silicone glue, such as GE silicone which can be found in the caulking area of the home improvement store. You can also use E6000, but it is a little more difficult to work with and has more of an odor. Be sure to use tiles that are rated for outdoor use. I mostly use vitreous glass and recycled glass. I get most of my tiles from mosaicartsupply.com
Leave the bottom inch of the mailbox untiled - the rim where the holes are for attaching the mailbox to the post. This area is a bit weaker and tiles can be lost during mounting. I also leave an untiled rim where the door opens and closes.
Let glue cure for a day or two and then grout with sanded grout. Usually a dark grout looks best. I use painter tape to cover the parts that won’t be grouted (otherwise you have to clean grout out of the holes and the door mechanism).
Let the grout dry for a day or two and then seal the whole mailbox with 511 Impregnator Grout Sealer.
Because mailboxes are exposed to the elements and get a lot of wear, inspect the condition every few months, especially the door. Because the door gets a lot of use, you may need to occasionally patch the grout or even replace a tile or two there. Re-seal with grout sealer every six months.
You can see some pictures of my process here:
https://blog.mosaicartsupply.com/mosaics-on-steel-mailbox-using-silicone-adhesive/
Other design considerations:
1. I personally think that a mailbox that has your address number or your name on it is less likely to be stolen or messed with. So I encourage you to personalize your mailbox.
2. First thing I do is remove the red flag that comes with the metal mailbox because it covers up the artwork. On my personal mailbox, I have a ribbon that hangs outside the box to tell the deliverer there is outgoing mail in the box.
3. Most of the time I tile standard metal mailboxes (wood is not appropriate for mosaic, as it expands and contracts). If you want a wall-mount letter box, an extra-large mailbox or double door box, let me know. I can mosaic tile anything, including your husband napping on the couch.
4. I tile the back of the mailbox, too. The back of my own mailbox is visible from the front window of my house, so I like it to be pretty. But no reason to tile it if it’s going to be covered up.
Mounting instructions:
Post: If you don’t already have a strong mailbox post, use a 4” x 4” wooden post or a hollow metal post 3 ½” square. Sink post into the ground with concrete.
Mailbox platform: I recommend using a Universal Mounting Bracket ($14 on my site or you can buy one at Home Depot/ Lowe’s/most home improvement stores). It includes instructions and screws, etc.
Second option is to secure a 6" x 18 1/2" block of wood to the mailbox post. Attach the mailbox to the wood base with 1 5/8" coarse-thread drywall screws through the side holes of the mailbox.
Maintenance:
Every 6 mo. or so, wipe down the mailbox with white vinegar on a clean rag. This takes off some of the haze. Then seal it with Miracle Brand 511 Impregnator Sealer. You can get it at most Home Improvement stores. It is not cheap, but miraculous things rarely are! Just apply it with a small paint brush, being sure to cover all the grouting, and then wipe it off with a rag.
Please send me an update if you have any problems at all.
Also: I really appreciate getting pictures of your mailbox after it’s posted.
Jill

-
HOW TO HANG/DISPLAY YOUR (LIGHTWEIGHT) MOSAIC PIECE
I will write more about hanging or installing heavier mosaic pieces later. The instructions here are good for the 8” x 8” piece on MDF that you made in my Mosaic Basics class.
If you want to use your mosaic on a level surface as, say, a trivet in your kitchen (and yes, you can put hot pots on it), then I recommend using the cork backed shelf-liner you can get at Home Depot or Lowes. They usually have a free-standing fixture with all the shelf-liners on it. (insert pic here)
If you want to hang your piece(s) on the wall, here is how I do it. (insert pics and directions)